Furniture restoration — rescuing a damaged oak table with beeswax polish
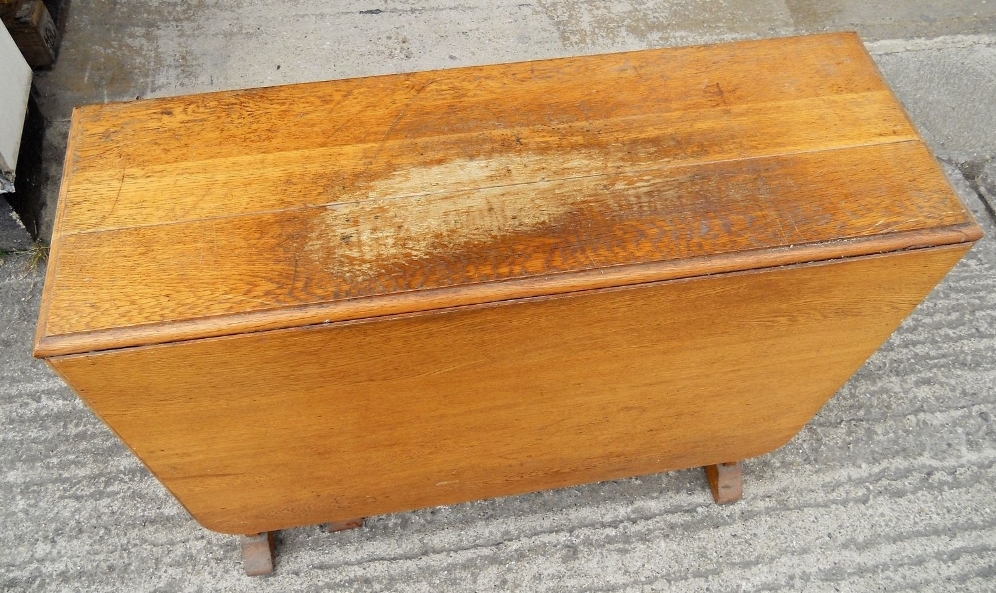
This nice old oak drop-leaf table had been badly neglected. In particular, the centre section had suffered from both sun bleaching and water damage, causing the wood in the middle to turn grey and lifeless. Next to the bleached area was a blackened patch. Also, due to extreme temperature changes, it had developed a nasty split in the centre section. With my furniture restoration hat on I decided to see what I could do to save it, mostly by sanding it down and applying our Traditional Beeswax Furniture Polish.
A badly neglected oak table in need of some attention
The middle section was in a particularly sorry state
As you should with every furniture restoration project I reviewed the damage to decide a plan of action. I decided not to strip the entire piece - the varnish on the legs did not look too bad, and with limited time available to work on it, I wanted to do something I stood some chance of getting finished. With this in mind, I sanded the table-top surface. I did not know how deep the damage would be, and my thoughts at this stage were that if I could get below the bleaching, and the colour of the wood evened out, I would polish the entire surface with our Neutral Traditional Beeswax Polish, for a lighter finish. If, however, the damage went too deep, I would use a combination of the Neutral and the Brown Polish, in order to darken the wood slightly, and disguise the discolouration.
Sanding the table was relatively easy using an electric sander. I started with a coarse grit, as there were numerous scratches and gouges on the surface and I knew I was going to have to remove quite a bit to make it smooth again. However, It soon became apparent that the sun and water damage in the central section was too deep to remove. I had sanded down quite a bit, and the discolouration was not going away; so I decided that damage limitation using brown polish would be the best option.
The next step was to repair the split. This kind of job is relatively straightforward as long as you have (or can borrow!), extendable woodworkers clamps like these. I just applied a generous bead of Evo-stik wood glue, fitted and tightened the clamps (using a couple of pieces of batton to protect the surface), then wiped off the excess glue that had squeezed out, and left it overnight. The next day I simply removed the clamps and ran the sander over the surface again with a fine grit, just to remove a few remaining traces of glue.
As I had expected, there was still a small gap showing in places, so I used a piece of beeswax as a filler. I simply rolled a tiny piece of beeswax into a "worm" shape and pushed it into the gap with my thumb nail. Then I gently removed the excess with a knife blade. Beeswax is brilliantly malleable. A small piece can feel hard between the fingers, but in minutes it absorbs enough heat to become soft enough to push into the smallest of gaps. The wax was naturally a similar colour to the wood in this case, but as I expected, would also be coloured slightly by the brown polish. For small repairs like this, I find beeswax much easier to use than modern wood fillers you can buy, as they often seem to dry out quickly and become a bit crumbly, especially when handled,
Push a small beeswax "worm" into the split
Trim off the excess wax
The table fully sanded and ready to polish
So now, at last, it was time to start applying polish! I began by applying our Brown Traditional Beeswax Polish. I used a small amount of the brown polish, just enough to cover the whole surface, and buffed it off. I did this three or four times, using only the minimal amount, until the whole surface had darkened just enough to disguise the discoloured area. At this point I was satisfied that the bleaching was no longer visible, and the overall surface had gained a nice antique sort of look. This is due to the way that the brown polish enhances the grain.
Now I had the kind of colour I wanted, all that remained was to continue polishing with our Neutral Beeswax Polish. At this stage, the amount of polish one uses depends very much on personal taste. During the first few coats you can see an improved shine and lustre with each application. My favourite method is to apply small amounts several times a day, over several days, and just to keep going until I am satisfied with the finish.
The finished surface
So that's the end of this furniture restoration journey! That saves a battered and discoloured oak table from being dumped and brings many more years of use and beauty out of a solid oak table. You may also like to read another furniture restoration piece, when I rescued a water damaged Indian hardwood box. Do you have any wood furniture restoration stories? Any tips and tricks you can share?


